

 After giving birth to our precious baby girl, I felt like I entered this crazy cool club where us mamas have each other’s backs. It’s nice knowing there are people who relate and even care, and especially great to try and give back. If it weren’t for all the moms who blogged their experience and tips, we probably wouldn’t have tried it out. When I first mentioned our choice to do cloth diapering, several moms were curious for more info. So… here it is…my lil way of giving back… your very own Cloth Diapering Crash Course!
Full disclaimer… cloth diapering isn’t for everyone. That’s totally okay with me. At the mention of it, people’s reactions vary. Chances are if you clicked your way to this blog post, then you are at least interested, if not intrigued. If you are considering it, just know that it’s best to go into it well prepared with all the right supplies (and proper quantity), otherwise you will most likely abandon ship (as it tanks into a leaky, poopy mess). Not because its really all that hard or complicated, but because not knowing what to expect and lack of preparation will feel overwhelming when you’re in the middle of an accident.
Stay flexible. Save receipts. If in the end, it just didn’t turn out well for you, you can return most items for a refund. We bought most of our items on Amazon, and if its on your registry, you have 90 days to return! Their customer service has been really awesome!
One thing I learned is that It’s SO not what I thought it was going to be (and not as hard as we thought). I pictured my mom back in the day with the clips, safety pins, the things that look like burp cloths etc., but when I saw the modern day cloth diapers, I was pretty excited to try it out. And, to be perfectly honest, our initial reasoning in choosing to do this wasn’t for the environment or even just the money savings (although it was our favorite perk!) We chose it simply because we really love finding great systems of doing things. I sort of fell down this rabbit hole of cloth diapering research while preggo because I was so fascinated. Even with all of that, we went into this fully accepting that it may not even work for us (for whatever reason), and that we would use disposables part time. But, we learned quite quickly that the amount of blow outs we got with disposables vs the zero poop explosions we got with cloth… it was a no brainer to go full time with cloth. Overall we were pleasantly surprised that it turned out to be an easy and great decision for us!


Why do people choose cloth diapering?
Well, one of the more popular perks is that it saves money in the long run. You have to think of it as an investment up front though. Disposable diapering can cost around $2000+ by the time the child is 2-2.5 yrs old. It’s gradual spending that accumulates. Think of all the Costco trips to pick up diapers and wipes…and that cost is PER child. For cloth diapering you can expect to spend anywhere between $300- $600, ONE time up front, depending on what supplies you buy (if you register for the items and people gift them to you, you’ll save even more money!) The cloth diapers fit all the way up until the potty training years, and can be handed down to the next child too–potentially preventing you from having to spend another dime. Using cloth avoids harsh materials from irritating baby’s sensitive skin and encourages diapers being changed more frequently, which results in diaper rashes being almost non-existent. The environmental side is another highlight for some because it doesn’t produce the heavy volume of waste that disposables do. Some reasons against cloth diapers are that it takes some extra work obviously, but also the energy consumption, and water usage involved is something to think about. We didn’t think it through this far, we really just thought it was less hassle to constantly replenish a diaper inventory, liked saving money, and conserving space in our humble abode.

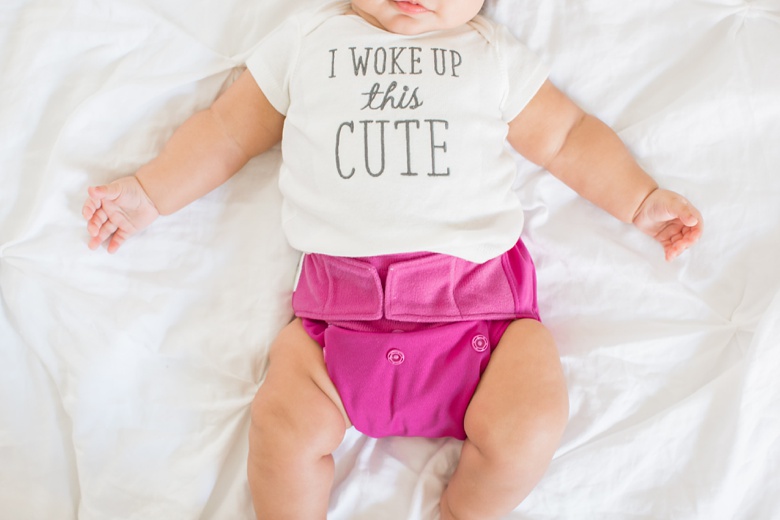
*QUICK NOTE* The modern day cloth diapers are adjustable and can expand to grow with your baby (using the row of snaps on the front as pictured below). 
OKAY! Let’s get started by defining some terms. Being a first timer, I absolutely had zero familiarity with the lingo. For the most part these are terms that are only relevant specifically to our experience with cloth diapering. There are SO many other options when you search “cloth diapering” on the web. I will only be referring to the more modern, practical system that we found worked best for our lifestyle.
TERMINOLOGY //
Hybrid Cloth Diapering: This means you use the type of diaper system that allows for the reusing of a “diaper shell”, while changing out the washable or disposable “diaper insert”. You need less diaper shells, since you can potentially just switch out inserts as needed… which means it’s a less expensive investment.
Diaper shell: This is a diaper cover lined only with a basic thin fabric (usually polyester, depending on the brand). It’s not meant to absorb waste (unless it’s an All-In-One). You pair it with an absorbent diaper insert of your choice (sometimes sold separately).
Diaper Insert: For lack of a better explanation, I like to describe this as kind of like a feminine sanitary pad, because they somewhat resemble it in both looks and function. They come in machine washable fabric, or disposable liners. I will only be talking about the washable kind, since this is all we use. FOR BEST RESULTS, YOU MUST PREP the inserts by washing several times before use (about 4+ times is what we did). This is because the inserts become more and more absorbent the more washes they get. Don’t ask me why… I just know this is what all the brands strongly suggest and its very true in our experience.

FAST FORWARD TIPS: We’ve learned that it’s all about the quality / absorption of theDIAPER INSERT and finding the perfect fit around baby’s bum and legs (the legs especially). These two tips together, make for less leaks and a stress free cloth diapering experience. The type of diaper shell really stopped mattering so much when we found the best insert. I mix and match brands of diaper shells, and use ONLY a specific brand of insert (the GroVia Stay Dry Soaker Pad!!). *Pictured above next to the heart*
All In One Diapers: These are diapers that have the absorbent diaper insert permanently sewn into the diaper. Some people consider these to be more convenient than hybrid because once soiled, you just take the whole thing off and put it in a wet bag. There’s no fiddling with the soiled contents on an insert. We’ve used both types. Our newborn diapers were all in ones and it was so awesome to use for that particular age range because you change diapers literally allllll day. However, once our daughter got older and grew out of the newborn size, there were less diaper changes so we found that just switching out an insert was much more convenient.
Hook & Loop: This in my understanding refers to the type of closure doo-hickeys the diaper shell has. This one is usually a velcro closure (our fave at the moment).
Snap closure: This is a diaper shell that closes using snaps… well duh.
Pocket Diapers: This just means there is a “pocket” built into the diaper shell that allows you to put the diaper insert inside so that it keeps it in place. You can totally still use the insert outside of the pocket too. Your choice. I choose to ignore the pockets since I like to be able to only change out the insert.
Cloth Wipes: This is also self explanatory… they are baby wipes made out of cloth. Great to use since you throw it in the wash with everything else. To use them you just dip in a little bit of water, or you can also make your own baby wipe solution (usually made up of water, and a few drops of your favorite essential oil).
CLOTH DIAPERING CRASH COURSE: THE ESSENTIALS //
Here are the cloth diapering products we found to be our absolute favorite and most essential. I say this because there are a lot of brands out there, and after trying several types of inserts and diaper shells, this is what we would have bought right from the get go to bypass saving receipts, and dealing with return policies from items that turned out to be duds.
How many diapers & inserts do you buy? It depends on what approach you go with. All In Ones vs Hybrid etc. Our magic number was 10 newborn all-in-ones, about 15 standard size diaper shells, and about 15 or so inserts. We could’ve easily managed with just 10 shells though. I erred on the safe side since it was our first time… and occasionally the poo gets on the shell… which means you have to change the whole thing out. Although, we’ve gotten pretty good at positioning the insert just right to prevent spillage on the shell.
Pretty much everything pictured can be bought on Amazon.

*Side note* // The GroVia brand is not the cheapest option, but after reading reviews and trying them out, to us they were far superior in quality to the others…therefore totally worth the investment. If you’re on a tighter budget, and have to cut corners somewhere, I would suggest buying less expensive diaper shells, but invest in the Grovia Stay Dry Soaker Pads. They fit just fine in other brand shells and better than the other inserts. Another brand we love is Essembly Baby. We tried them out with baby #2 and quickly became a favorite.
1. GroVia Newborn All in One Cloth Diaper (AIO)- (fits 5-12+ lbs) // We used disposable diapers for the first couple weeks just to be careful with the umbilical cord, but once it fell off we were less freaked out and brave enough to start using these. Our baby was petite (6lbs as birth) so we definitely benefited from using the newborn size. As mentioned above they are All In One (see definition above). We had 10 that we cycled through (washed them every evening). You don’t want to buy too many newborn size because babies typically grow out of them by the 2nd month (maybe sooner).
2. GroVia Hybrid Part Time Package: 6 Shells + 12 Stay Dry Soaker Pads // This is a great value pack if you’re ready to commit to this brand. I LOVE these velcro closure diapers SO much. So easy to use! Big plus that it includes the Stay Dry Soaker pads because they are by far the best and ONLY diaper insert we use. After trial and error, these inserts proved to be SO absorbent that the others just couldn’t compete. These made all the rest seem like glorified wash cloths. Even at first glance you can tell they are of higher quality, made so purposefully and strategically shaped and everything. Every baby is different, some are heavier wetters than others, so absorbency will vary. After experimenting, we learned that our lil one at 3-4 months old could go up to 3-4 hours without needing a diaper change (although we usually changed it before the 3 hour mark). Because they are so absorbent, everything stuck to them and we needed only 1 wipe to clean up.
3. GroVia Experience Package: 2 Shells + 4 Stay Dry Soaker Pads // This is a great buy if you just want to dip your feet in with this brand and also try the Stay Dry Soaker Pads. I bought these to try out their snap closure and I love them as well. I read that the snap closure diapers come in handy when the kiddos get older, closer to toddler age and gain ability to pull the velcro off. Lets hope it doesn’t come to that though…
4. GroVia Reusable Cloth Diaper Wipes, 12 Count// These are thicker quality cloth wipes then others. We use them to either dry after wiping or for heavy soiled diapers that need extra wiping.
5.Buttons Flannel Baby Wipes – 15 Pack // We use these wipes the most. They are similar thin-ness to disposable wipes and gentle to the touch. We bought 2 packs, so 30 in total.
6. Natural HE Powder Laundry Detergent by Rockin’ Green, Classic Rock Unscented // This Detergent is THE BOMB.COM, it gets out everything from our cloth diapers. Our diapers and inserts are stain free because of this soap. We achieve this by always using 3 scoops of it in the wash. We also use it for anything else that gets soiled, not just diapers.. and it works just as effectively! To keep them in the best shape, just be sure not to let your dirty diapers sit longer than 2 days before washing (all brands recommend this).
7. SmarterFresh Cloth Diaper Sprayer // Another ABSOLUTE must have… THIS. People always ask me, ” But what do you do with…the… “stuff(poo)?” Well, this thing mounts right onto the side of your toilet (installation was easy… or so my husband said). After every diaper change, we put the soiled pieces to the side (or in a separate wet bag when out and about), and simply use this sprayer to rinse it all off into the toilet before it goes into the wash. Make sure you have good water pressure and you never have to touch any of the “stuff”. For trips and convenience while traveling this portable diaper sprayer is great to have too.
8. Spray Pal – Cloth Diaper Sprayer Splatter Shield // This may seem like a silly thing to have… and I was even super fighting having to buy it… but we gave in because it was just too essential. When using your diaper sprayer, you will learn that it does indeed spray everywhere– unless you have a sprayer shield. I had initially wanted to make my own, but really after having a baby I said forget it…. I’m just going to buy it! It’s got a clip at the top to hold the diaper / insert for you while you spray. Keeps all spillage in the toilet, where it belongs.
9. GroVia Zippered Wetbag (portable) & The bigger capacity one for at Home in the Laundry Room // This item in a must have. Its where you store the soiled diapers before laundry time. Ideally you have a portable one to have in the diaper bag and one at home. The larger capacity one can hang in the laundry room / or bathroom. Find one that fits a good amount of diapers / inserts and you’re good to go!
10. The Original CJ’s BuTTer Spritz // I mentioned before that you can’t use just ANY diaper cream when cloth diapering. Certain chemical ingredients in different brands will ruin the diapers. This particular one is safe and we actually put this one in the diaper bag because the spray capability is convenient when on the go. We rarely ever need it, but its there for emergencies. Check out this reference to decide which diaper cream is best for you! Its give a more thorough explanation of why you have to choose carefully and what options you have.
11. Water Wipes Baby Wipes // We keep a small stash of these disposable wipes on hand for emergencies as well. When you’re on the go and in tough situations, these get the job done. Other brands would work well too if you want (Honest, Kirkland).
12. Petunia Pickle Bottom: Pathway Backpack Diaper Tote // This was just the first bag we bought. For our 2nd child we ended up buying a higher quality (splurged) diaper bag from Mina Baie. It’s not pictured but its my favorite.
13. BabyBum Mini Diaper Cream Brush // This is the mini version of the bum brush and it came out after we bought the full size version. We like it better because its compact and saves more space. It can be thrown into the diaper bag easier too because it comes with a travel case.
14. Angel Baby Bottom Balm Natural Cloth Diaper Cream // This is our favorite diaper cream (it goes on as more of an ointment). My husbands also LOVES the smell of it. Perfectly safe to use with cloth diapers and works like a charm! Again, you may want to try out some others, so feel free to check this reference and experiment.
Baby Changing Station //

What’s on the table:
- the usual Changing Pad (ours is by Summer Infant)… really any changing pad will do.
- Excess Water/wipe solution run off container (any sort of container you have laying around works, mine is the copper cup pictured above)
- Bottle filled with water (or your own DIY wipe solution) I literally paid $1.50 from a store called Daiso
- Baby Bum Brush (I personally prefer the new tiny travel size one.
- Diaper caddy & contents:
-
- // left side with usual baby essentials: thermometer, bulb nose syringe, baby tylenol, combs/ brushes, ointments /lotions, baby diaper balm, etc (fill in what items are must have for you).
- // right side with cloth wipes and a tiny stash of about 4 disposable diapers (there’s also a stash in the diaper bag for emergencies as well). We buy very minimal disposables for over night so we don’t have to wake up in the middle of the night to check the diaper.

EXTRA INFO & TIPS //
Pour just enough water to wet the cloth wipe (about the same wetness as disposable wipes…you can squeeze out the excess into your run off container, and then get to wipin’! Clean and refill as needed. Finally, just throw all the soiled items into a machine washable (preferably waterproof) wet bag that hangs nearby . We like to keep the soiled diapers with solids (poo!) separate or placed in a bag near the toilet for rinsing later or at earliest convenience. Remember don’t let them sit longer than 2 days before washing to avoid stains setting in etc. Throw all soiled items in the wash, including the wet bag, and tumble dry on low / delicate. (Most diaper shells can be flat or air dried…they dry relatively fast this way).
These are the diaper shell brands we held onto and really liked //  GROVIA HOOK & LOOP (Velcro $16.95 each) // GROVIA SNAP ($16.95 each) // BUTTONS ($13.50 each) // NORA’S NURSERY (Only sold in a 7 pack for $59.95 + bonus wet bag, includes inserts, but we weren’t a fan of them). ESSEMBLY BABY (not pictured)
*See bottom of this post for complete list of the different brands + prices of cloth diapers to choose from*

This is so you can see what the inside of the diaper shells look like. GroVia (right) looks different because it has a breathable mesh (but still waterproof), (Top Left): Nora’s Nursery (also pretty identical to Alva, Bum Genius, and many more), has a soft polyester type lining. (Bottom Left): The Buttons brand has more of a plastic wipeable lining.

DIAPER INSERTS WE’VE TRIED //

Left to Right// Nora’s Nursery / Alva, Natures Charocal Insert, <3 GroVia, Bum Genius Best Bottoms.
WINNER: GroVia // The inserts from Nora’s Nursery, Alva, and a few other brands are literally identical. I returned all of them after trying just one. All of these felt like soaked wash cloths and just didn’t compare to the absorbency of the GroVia Stay Dry Soaker Pads. The Charcoal ones…had an ok absorbency, but fit awkwardly in diaper shells.
CLOTH DIAPER BRAND GUIDE // If you’d still like to do your own experimenting with brands, here is a list of a bunch you can consider & their relative cost:
ESSEMBLY BABY // $13 each for outers, and $12-$14 for inners. Can be bought direct or at Target
GROVIA //$15.95-$16.95 each – Newborn Size: 5-12lbs. , Standard Size:8-30 lbs. (inserts sold separately). My top fave because of the quality in craftsmanship and absorbency of their inserts, but they are pricier than others (totally worth the investment, if you can fit it in your budget).
BUTTONS // $11.50-$13.50 each – Newborn Size: 7-12 lbs, Standard Size: 9-35 lbs. Love these diaper shells, but haven’t tried their inserts (sold separately)
NORA’S NURSERY// $59.95 for a 7 pack of shells + wet bag & inserts – One Size 7-33 lbs. These inserts aren’t that great, but the diaper shells are adorable and function well
BUMGENIUS // $19.95 each – One size, 7-35+ lbsPrice includes diaper shell + 2 sized inserts (newborn & one for an older baby). I really loved this brand, but it was hard to find after a while.
RUMPAROOZ // $10- $26 each, or $60 for a pack of 6 (price may or may not include inserts) – Newborn size: 4-15lbs, Standard Size: 6-35 lbs. Come in diaper shell only, or pocket type diaper + insert.
ALVA BABY // $8.79 each or $30-$58 for pack of 6 shells + 12 inserts – One Size: 8-35 lbs
MAMA KOALA // $8.49 each or $39+ for pack of 6 shells + 12 inserts – One Size: 8-35 lbs
CHARLIE BANANA // $18.55- $22.88 each or $110- 119 for pack of 6 shells + 12 inserts – Sizes vary
THIRSTIES// $13-$25 each or $66-$98 for pack of 5 – 2 Sizes: 6-18 lbs or 18-40 lbs.
Phew… if you got this far, then you’re dedicated to learning more about cloth diapering. I hope this Cloth Diapering Crash Course has been informative! Feel free to reach out and tell me how your progress is going, or ask questions in the comments. I’d love to hear of this post helped you!
comments